


Automate your Payneteasy back office: the UI API is now fully documented
Explore the documented Payneteasy UI API with OpenAPI 3.0.1, 1,500+ operations, scoped access, restricted tokens, and support for AI-driven automation.
08.09.2026
6 min read
Meet us at conferences around the world

SiGMA Europe
Explore the documented Payneteasy UI API with OpenAPI 3.0.1, 1,500+ operations, scoped access, restricted tokens, and support for AI-driven automation.
The UI API — the interface behind the screens your team works in every day — now comes with a complete, machine-readable OpenAPI specification: more than 130 services and more than 1,500 operations. What you can call depends on your account level; the specification is documented under Tools → API documentation, behind your Payneteasy login. Everything your team does by hand in the back office is now something you can automate, integrate into your own systems, or hand to an AI agent — on your terms.
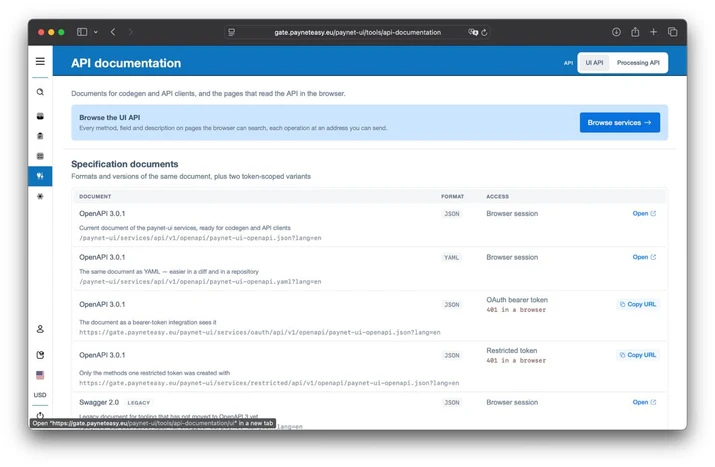
If you already process with Payneteasy, you already use the Processing API — the one that moves money: authorizations, captures, refunds, payouts. The UI API is a different surface — the API behind the screens themselves: Orders, Reports, Tools and Settings. Everything your team currently does by hand: posting adjustments, editing routing, creating endpoints, running reports, onboarding merchants. The UI / Processing switch in the docs shows both; this release documents the UI side in full.
Wiring that back-office work into your own systems — or handing it to an agent — means calling the API underneath, and a machine-readable contract is what turns that into a documented integration instead of a reverse-engineering exercise: you build against documented specifications, not network traffic. This isn’t a preview — the UI API is the same production API the interface itself runs on, versioned under /api/v1. Every method you build against is already live.
The UI API follows the platform: it changes as the product does. Removals and renames are announced in the release notes before they take effect, so you can see them coming.
The point isn’t the method count — it’s what stops being manual. For example:
The report pull that took 40 minutes of clicking each morning becomes a cron job — or a task you delegate to an agent. Work your team does by hand becomes work your systems do on a schedule.
Payneteasy gives an agent two deliberate ways to work with the platform.
A restricted token is issued from your user profile: pick the methods it may call, and the token can do those and nothing else. It’s the right way to hand an internal team, a partner or an AI agent a slice of the API without giving up full access — the token is scoped at issue time, and control stays on your side. You set how long it lives — up to 180 days — and can revoke it at any moment.
For example: an agent that pulls the decline report every hour and flags anomalies needs a token scoped to a few read methods — and can touch nothing beyond them. A write agent that reruns failed payouts gets exactly those methods, and no access to routing or settings.
Note the token still inherits the rights of the user who issued it, intersected with the method list. Issue restricted tokens from a purpose-made service user, not from an admin account.
The specification is served as OpenAPI 3.0.1 in JSON and YAML — built for codegen and API clients — with a legacy Swagger 2.0 file for older tooling. Point your existing toolchain at it and generate a typed client in minutes, instead of tracing calls by hand.
You don’t have to install anything to read it. Every service, operation and field is documented on pages you browse and search right in the back office, each operation at its own address. Open one and you get its description, and its request and response fields with types and explanations, alongside an example response. Requests aren’t sent from the browser — the pages are for reading and understanding the API, not for calling it.

The specification is served in variants scoped to how you connect:

Every operation page shows the request in all three variants, so you can copy the exact call for the access method you’re using.
Operations are grouped by service and by verb — create, get, save, change, remove — and filterable by READ or WRITE, so a reporting integration and a write automation both start from the same searchable catalog.

A documented UI API changes what your team can do with the platform — without changing how the platform works underneath:
The result: the operational work that lives in your Payneteasy back office can move into your own workflows, on your own timeline.
Available now — the specification is documented under Tools → API documentation (what your account can call depends on your access level).
Thank you for reaching us. Your request has been sent successfully. We will get back to you as soon as possible.
Message was not sent
