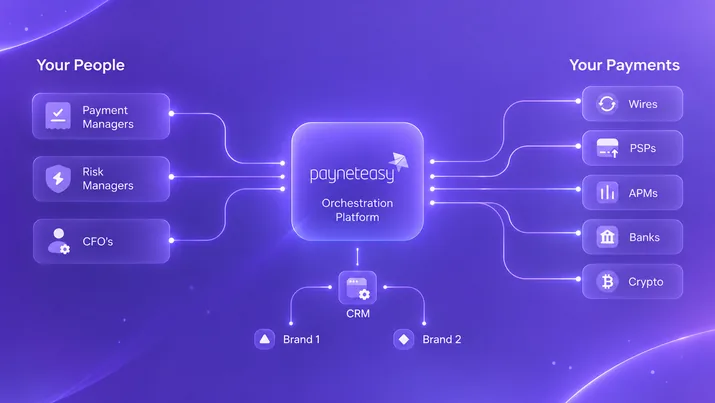
Payment orchestration API integration connects an existing checkout to a payment orchestration platform and the payment providers configured for a business. Your application starts the payment and manages the customer journey, while Payneteasy Payment Orchestration processes the request according to the configured channels and routing rules.
The integration boundary matters: a successful initial API response is not necessarily a completed payment. Your application must handle the final result through the applicable callback or status flow before marking an order as paid. Adding a provider also requires checking its availability, configuration and payment flow before offering it to customers.
Define the Integration Boundary First
Before writing code, decide which system owns each part of the payment journey.
| Responsibility | Your application | Payneteasy Payment Orchestration |
|---|
| Payment options shown to the customer | Presents the options agreed for your markets and checkout flow | Connects the payment channels configured for your setup |
| Order and customer experience | Creates the order and manages the checkout screen | Processes the payment request |
| Provider selection | Supplies the transaction details required by the integration | Applies the configured routing rules |
| Final result | Updates the order and tells the customer what happened | Provides the transaction result through the applicable callback or status flow |
This boundary keeps your product in control of its customer experience while provider connections and routing are managed in the payment infrastructure. It also exposes a common integration mistake: showing a payment option in checkout before confirming that the corresponding channel is configured for the customer's country, currency and transaction type.
Build Around the Full Payment Lifecycle
The first approved test transaction proves that an API call works. It does not prove that the checkout handles the situations customers will encounter in production.
The broader payment gateway API integration concepts provide useful background. For this checkout integration, implement the complete payment flow:
- Create the request. Send the order and transaction details to the configured Payneteasy endpoint.
- Handle the customer step. Depending on the method, the customer may complete a form, leave the checkout for authentication or return from a provider page.
- Receive the outcome. Process the documented callback or request the transaction status when the result is not yet final.
- Update your order. Match the result to the correct internal order and show the customer its current state.
Design the order state for payments that remain in progress, customers who close a page and results that arrive after the browser session ends. The application should not mark an order as paid merely because the initial request returned successfully.
Payment orchestration API integration should distinguish the customer’s order from each payment attempt. Store the platform’s transaction identifier alongside your internal order ID, amount, currency and payment status so callbacks and status responses can be matched to the correct transaction. Validate notifications using the documented mechanism and handle repeated callbacks without triggering duplicate fulfilment. If a request times out, check the transaction status before submitting another payment request: a missing response does not prove that the payment failed. These controls help an existing checkout handle asynchronous payments and alternative routes while keeping order records consistent.
The Payneteasy API documentation describes the available payment flows, callbacks and status requests. Choose the use case that matches the method you intend to launch, then test its complete journey.
Treat Provider Coverage as Configuration, Not a Promise in the UI
Payneteasy maintains more than 1,000 payment integrations across providers, payment methods and platforms. That describes the range of available connections. It does not mean every integration is a PSP or that every option is active for every customer.
Start with a defined set of requirements: the countries and currencies you serve, the transaction types you need, and the providers you have arranged to use. Confirm which channels are available for that setup before adding their methods to your checkout.
When you add a provider later, check whether its payment flow requires a different customer step or additional information. A shared API can reduce repeated provider integration work, but method-specific requirements still need development and testing where they apply.
Configure Routing for Real Payment Outcomes
Connecting multiple providers gives your business more possible routes. Routing rules decide which connected route receives a transaction; cascading can provide another attempt only when the configured conditions and transaction outcome permit it. See how cascading works.
Those rules should reflect the payments you actually process. A confirmed failure may be eligible for another attempt; a timeout with an unknown outcome first requires a status check. Before enabling an alternative route, decide which transaction outcomes qualify, whether the next provider supports the same flow and how your application will display the final result.
Your checkout should receive a dependable transaction outcome without having to reproduce the provider-selection logic in its own code. Your payment team should still be able to review which route was used and whether the configured rules behaved as intended.
Decide How Card Data Is Collected
An API connection alone does not determine whether raw card data enters your application. That depends on the checkout design.
If you need card inputs within your branded page, Payneteasy Hosted Fields places the sensitive fields in Payneteasy-served iframes. Your page and backend receive a token for the payment request instead of the raw card number, expiry date and CVV. This can reduce PCI DSS scope, but the applicable requirements must be assessed for the complete implementation.
Make this decision before finalising the frontend and backend flow. Changing card-data handling late in development can affect both.
Test the Handoff Before You Go Live
Run sandbox tests for the states your application will have to explain to a customer and reconcile internally:
- an approved payment and a decline;
- a payment that remains in progress;
- an authentication or provider redirect that the customer abandons;
- a delayed callback or a repeated notification;
- a configured route that cannot be used;
- a new payment method whose customer flow differs from the methods already live.
For each case, check the internal order, the status shown to the customer and the transaction information available to your payment team.
Payneteasy publishes its Processing API as an OpenAPI 3.1 specification. Engineers can use the machine-readable contract to inspect operations and generate client code. The specification supports implementation; the selected payment flows, provider configuration and end-to-end tests determine whether the integration is ready.
Plan the Migration From Your Existing Payment Integration
Payment orchestration API integration must account for transactions created before the checkout changes as well as those submitted afterwards.
Keep Earlier Transactions With Their Original References
Keep the original provider references for earlier payments and confirm how outstanding captures, refunds and settlement reconciliation will be handled. Continue tracking pending transactions during the transition rather than submitting them again through another provider.
Check Saved Cards and Recurring Payments
Check whether existing saved-card tokens and recurring-payment arrangements can be used with the new connection or require a separate migration.
Separate Sandbox and Production Settings
Configure production API endpoints and server-side credentials separately from sandbox settings.
Monitor the Rollout and Define Rollback Conditions
Start with a defined set of supported payment methods, currencies and markets, then expand after validating the live payment flow. Monitor authorisation rates and checkout completion separately: an approved payment and a customer completing checkout measure different parts of the journey. Define when to pause the rollout or restore the previous integration.
Direct PSP Integration vs. Payment Orchestration API Integration
| Direct-to-PSP integration | Payment orchestration API integration (Payneteasy) |
|---|
| Engineering effort per new PSP | Provider-specific integration and testing; available SDKs or connectors may reduce development work. | Configure and test a supported provider connection. Additional development may be needed for new connectors or method-specific requirements. |
| Time to add a PSP | Depends on provider onboarding, integration scope and testing. | Payneteasy cites 1–2 weeks for a new PSP connection through Payment Channels. Confirm prerequisites, scope and testing requirements for your project. |
| Routing and cascading | Your team implements and maintains routing and retry logic across its provider connections. | The platform applies configured routing and cascading rules to supported connections and eligible transaction outcomes. |
| API specification | Varies by provider; OpenAPI specifications may be available. | The Processing API is documented through an OpenAPI 3.1 specification. |
| Provider relationships and settlement | The business manages its provider arrangements and the associated settlement terms. | The business retains its PSP or acquirer arrangements and settlement risk. Payneteasy is a technology platform, not a payment facilitator, and does not hold merchant funds. |
Getting Started: From Integration Planning to a Live Checkout
Start with the existing checkout and the payment flows you intend to launch:
- Map card-data collection, authentication, callbacks and order-status handling against the relevant Payneteasy API documentation.
- Confirm the initial providers, supported markets, currencies and transaction types, together with the required commercial arrangements and credentials.
- Configure routing and, where appropriate, cascading rules for the available connections.
- Test the complete customer journey, including pending payments, declines, abandoned authentication and delayed or repeated callbacks.
- Agree the launch schedule based on the integration scope, provider readiness and test results.
- Before adding another provider, confirm whether its payment flow requires additional checkout changes.
For operational analysis after launch, teams can optionally connect an MCP-capable AI assistant to Payneteasy MCP using a scoped, time-bound and revocable token. MCP provides read-only access to permitted backoffice data: it cannot authorise, capture or refund payments, or change settings. It is separate from the Processing API and is not required to integrate the checkout.